JSON Tag and JSON Client were created to enable a vendor-agnostic first party tracking using server-side Google Tag Manager (ssGTM). This approach provides a highly flexible and controlled way to send data to various destinations.
- JSON Tag is a tag template for client-side Google Tag Manager (GTM), allowing you to define custom JSON payloads and to send them to your ssGTM instance.
- JSON Client is a client template for ssGTM that receives JSON Tag events, transforms the payload into event data and enables forwarding to any destination using ssGTM tags.
To support session and user (re)identification, an ID Service has been integrated. This service uses server-set cookies, ensuring the most reliable possible visitor tracking when no login ID is available.
Why We Created JSON Tag & JSON Client
We started working on JSON Tag and JSON Client because no existing solution fully met our needs. Thanks to contributions from colleagues it evolved from a weekend project into a powerful and versatile first party tracking solution with numerous use cases.
Our goals:
- Avoiding dependencies to third parties by using first party tracking with a vendor agnostic approach
- Being able to work with JSON Payloads in the client and the server
- Being most robust against Ad Blockers and ITP using Server-Set HTTP-Only cookies from first party context
- Supporting Analytics-Tools like Amplitude, Adobe Analytics, Mixpanel and Matomo as Destination and not focussing only on GA4
- Supporting Native Apps
JSON Tag and JSON Client were build with all of this in mind while the other already existing solutions did not fully fit to all of these needs.
Comparison to other first party tracking solutions
JSON Tag & JSON Client are similar to other solutions like WalkerOS, Snowplow and Stapes Data Tag and Data Client. However, there are a couple of differences. In this paragraph we will go through these differences to analyze the pro and cons of each solution.
Upsides and Downsides of WalkerOS
WalkerOS is a powerful first party tracking platform which started with a small Javascript library called walker.js. Today it also supports server-side Tracking in Node Apps. The core idea is a tagging system using HTML Attributes which are then transformed into JSON events. These events can be sent to various destinations. It also supports various triggers like DOM Ready, Clicks or visibility triggers. These Triggers can be configured right in the HTML Attributes.
This can be very beneficial if you want to simplify the Tag Management Implementation and to avoid custom code. However it requires considerably high development resources which are often not available.
It does also not support Native Apps yet and was not initially built for the Google Tag Manager. That’s why it does not integrate with GTM and sGTM as seamlessy as other solutions do.
WalkerOS is also using client-side set cookies by default. It requires additional efforts to set the cookies server-side which is important to be more resistant against ITP and Adblockers.
Upsides and Downsides of Snowplow
Snowplow is a customer data infrastructure (CDI) solution and comes with various trackers for client- and server-side tracking. This includes dedicated SDKs for Native Apps. It offers a pipeline to collect the data, validate it using JSON Schemas enrich the data and ingest it into a data warehouse. Snowplow had been open source in the past but now it is not open source anymore. Nowadays the setup and maintenance of the pipeline is a paid service.
Actually it is possible to use Snowplow without the Pipeline by sending the data directly to the ssGTM from the Trackers. But the question is, if it is actually worth using Snowplow if you do not take advantage of the Pipeline at all. It would add considerably high overhead in the first party tracking and processing, because you need to use placeholder schemas and create so called custom context entities to send your data to ssGTM. In the ssGTM you would then need to unpack the data to get it in the right format in the event data.
Snowplow uses client-side set cookies by default but there is a documentation on how to set up an own id service to take advantage of server-side set cookies. This requires a server-side implementation outside of ssGTM. In the consequence this introduces an additional dependency in the first party tracking with the need of an additional server call for each full page load.
The next solutions both have such an id service built-in which makes them much easier to setup.
Upsides and Downsides of Data Tag & Data Client
Data Tag and Data Client had been designed from Stape to send data from GTM to ssGTM without relying on gtag (the Tracking library from GA4). They also offer a couple of features for convenience like sending common marketing cookie values in the event data or transforming and storing individual data points.
It is very straight forward to use and can be used in a very flexible way. It also offers Android and iOS SDKs.
The Data Client creates a server-set cookie by default, but it is generated in the GA4 specific format. Overall it seems that Data Tag and Data Client are designed to support GA4 as Destination Analytics Tool. However, if you want to feed other Tools with the data, which require a common UUID v4 as device identifier or an own timestamp based session id cookie, it is maybe not the right choice.
If you do not want to send data to GA4 in the end and if you want to have even more flexibilities with less predefined settings, then JSON Tag and JSON Client might be the best fit for you.
Upsides and Downsides of JSON Tag & JSON Client
JSON Tag and JSON Client have been designed for GTM and ssGTM and can be used well to send data to analytics tools such as Amplitude, Adobe Analytics or Matomo. It was not built to support GA4 as Destination Analytics Tool. It focuses on the basics of first party tracking without much code. This ensures it can be easily reviewed and understood by anyone.
Within a JSON Tag in GTM a so called JSON Tag Variable can be used to reuse the same settings and global event payload in multiple JSON Tags. Additionally event specific payload can be specified in each JSON Tag.
JSON Client has a built-in id service to create a server-side set device (UUID v4 format) and session id cookie (timestamp format). In also supports sending a failure event with detailed information from the failed tags. Another special feature is the ability to send custom data from your server tags in the JSON Client Response.
To sum it up, if you want to send data to GA4 or if you are a less technical person, Stapes Data Tag and Data Client might be a better fit for you. Otherwise you should give JSON Tag and JSON Client a try and follow the details in the next sections!
How to use JSON Tag & JSON Client
Prerequisites
The only prerequisite to be able to use JSON Tag and JSON Client is a running ssGTM instance.
To fully benefit from long lasting cookies and to make your first party tracking resistant against ITP and Adblockers, these points should be considered:
- If the ssGTM had been setup on a third party server like the Google Cloud Platform or with another provider, it will not be resistant against ITP or Adblockers if no additional measures had been taken. This is the case even if it is accessible under the same root domain as the website. The reason is the so called CNAME cloaking. CNAME cloaking occurs when a different IP address range is used for the same root domain. Apples ITP and ther tracking preventions can detect and block this.
To solve this, the ssGTM should be setup on the same server where the website is running. This ensures that the website and the ssGTM use the same IP address range. Alternatively it should be used in same origin context using a solution like cloudflare workers. This would work for third party setups as well. - When using the GTM Loader Template from Simo Ahava, it is possible to load the client-side GTM through a proxy from your ssGTM. This is more effective against tracking preventions compared to the built-in client template from Google because it allows to specify a custom path and filename as well. In this Pull Request the support of a custom data layer name and for custom environments had been added by me.
Setup Steps in Summary
- The first step is to install and configure the JSON Client template at the server
- Afterwards you can install the JSON Tag Variable template in your GTM
- Then you can create a JSON Tag Variable and point it to your ssGTM instance with the configured path for the client
- Finally you can create JSON Tags and use the JSON Tag Variable to reuse your global settings
We will go through these steps in detail now!
The client-side GTM Templates are now available in the Community Template Gallery!
The JSON Tag and JSON Tag Settings Templates can now be installed easily using the Template Gallery in GTM. JSON Client will still have to be installed manually as Client Templates for ssGTM are currently in general not accepted for the Gallery by Google.
How to use JSON Client
Installation of the Client Template
- Download the template.tpl from the GitHub Repository
- Go to the Templates Section in your server-side GTM Instance
- In the Client Templates Section click on “New”
- Select “Import” in the three dots menu at the top right
- Select the Downloaded template.tpl file and save the Template
- Close the Template Editor and go to the Clients Section
Usage and Configuration Options
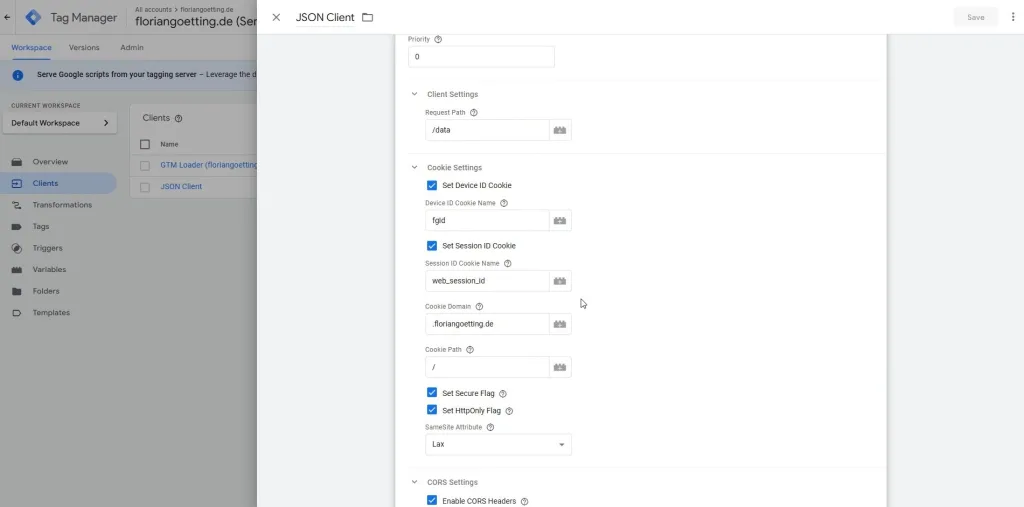
After you added this Template to your container, you can create a new Client with it. In the Clients Section click on “New”. Then you need to choose “JSON Client” as the Client Type.
Configure the JSON Client according to your needs and save it. For more details about the various configuration options please check the documentation in the GitHub Repository.
How to use the JSON Tag Variable
Installation of the Variable Template
- Go to the Templates Section in your GTM
- In the Variable Templates Section click on “Search Gallery”
- Search for “JSON Tag Settings”
- Click on “JSON Tag Settings” in the results and on “Add to workspace”
- Go to the Variables Section and start using the Variable
Usage and Configuration Options
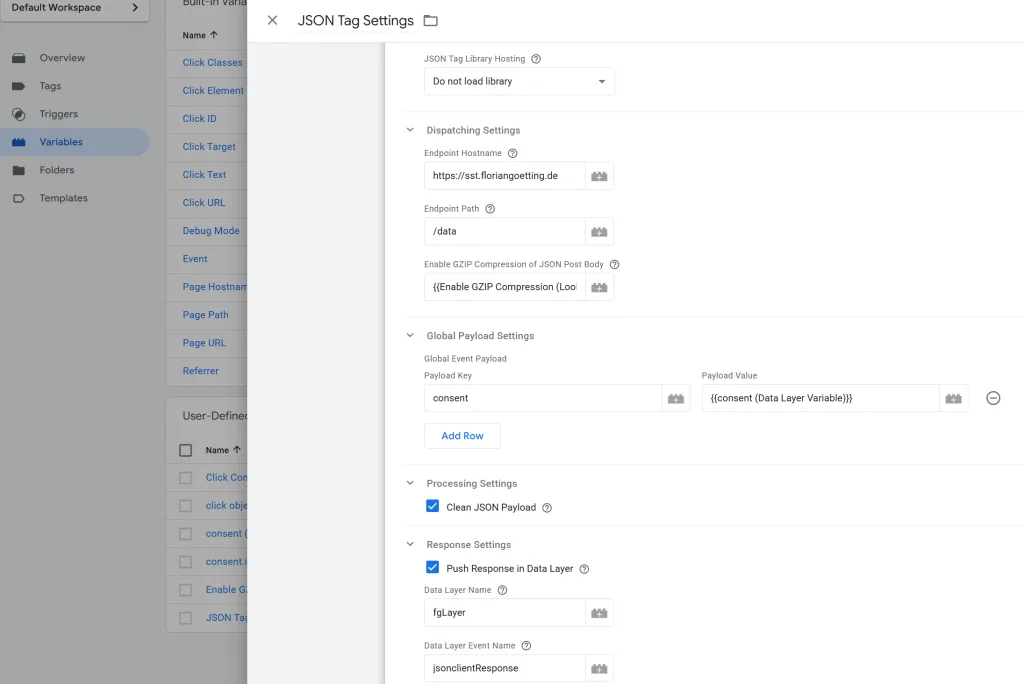
After you added this template to your container, you can create a new variable with it. In the Variables Section under “User-Defined Variables” click on “New”. Then you need to choose “JSON Tag Settings” as the Variable Type.
Fill our the fields and save the variable. For more details about the configuration options please check the documentation in the GitHub Repository.
This variable needs to be selected in each JSON Tag under the “Global Settings” in the field “Global Settings Configuration Variable”.
How to use the JSON Tag
Installation of the Tag Template
- Go to the Templates Section in your GTM
- In the Tag Templates Section click on “Search Gallery”
- Search for “JSON Tag”
- Click on “JSON Tag” in the results and on “Add to workspace”
- Go to the Tags Section and start using the Tag
Usage and Configuration Options
After you added this template to your container, you can create a new “JSON Tag”. Select your JSON Tag Variable in the “Global Settings Configuration Variable” field.
Set an Event Name and pick one of the predefined Event Types or define your own one.
Configure your event specific Payload by defining your JSON Keys and selecting your GTM Variables in the Payload Value fields.
Specify a Trigger to define when your JSON Tag should fire.
Test if your JSON Tag fires as expected and contains the right data by using the client-side and server-side GTM Preview mode.
For more details please check the documentation for the different options in the GitHub Repository.

Special features of JSON Client
In this section I want to highlight some special features of JSON Client in more detail.
How the ID Service works
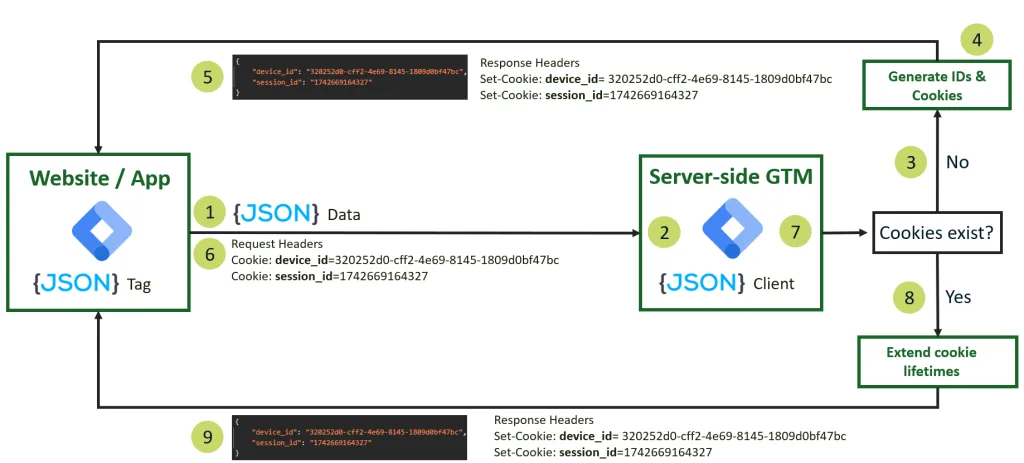
In the image above you can see the process how JSON Client generates a new device- or session-id. Because the ID Service is built-in in JSON Client, there is no need of an additional server call as for example with the solution from Snowplow. The cookies will just be created server-side as part of the first party tracking.
If device- or session-id cookies are activated, JSON Client checks if a the cookie exists when it receives an event. In case the cookie already exists, the lifetime is extended. If the cookie does not exist yet, the cookie value is calculated and is directly available in the event data as client_id in case of the device id and as session_id in case of the session id.
The cookies are then created server-side and returned with the JSON Client response.
This process works for Native Apps as well but needs some custom adjustments as Native Apps do not directly support cookies. More about this is described in the next section.
Support of Native Apps and App Webviews
There is no native SDK or direct support for the mobile client-side GTM for JSON Tags. However, it is possible to generate JSON payloads in a native app and send the data to the JSON Client endpoint in server-side GTM.
Android Sample Tracking App available on GitHub!
A sample Android app demonstrating this setup is available on GitHub. It generates JSON payloads and sends them to the ssGTM, where the JSON Client receives and processes the data.
➡️ Check out the JSON Tag Test App for Android and its configuration guide for implementation details.
Handling Origin Headers
Native app requests typically don’t include an Origin header. This is not a problem: if the JSON Client doesn’t detect an Origin, the request is automatically accepted without Origin validation.
Managing Device and Session IDs in Native Apps
Since native apps do not support cookies, a custom mechanism must be implemented to persist the device ID and session ID.
On the first tracking call, the JSON Client generates a new device ID and session ID, which are returned in the response.
The app must then store this information locally and include both IDs in subsequent requests—either by:
- adding them to the payload (“client_id” for the device ID and “session_id” for the session ID), or
- sending them as cookie headers using the cookie names defined by the JSON Client.
If both the payload and cookies contain client_id and session_id, the values in the payload take precedence.
This method is implemented in the Android test app and can be customized for your app.
Support for App Webviews
The same principle applies to webviews:
- Inject the device and session cookies into the webview using the configured cookie names.
- This ensures the JSON Client reuses existing IDs rather than generating new ones.
This logic is also part of the Android test app and can be adapted to your project setup.
Sending Data from Server Tags in the JSON Client Response
JSON Client is capable to receive message data from Server Tags and sends the data in the response. The JSON Tag is then including this data in the Data Layer Push. This allows the data to be used in the client-side Google Tag Manager.
If you want to use this feature, you would need to update the Template Code of the Server Tag where you want to send data from.
Please note
When updating a Tag Template, you won’t receive automatic updates of the Tag Template anymore from the Template Gallery.
Sending Data from a Server Tag to JSON Client
If you want to proceed with this anyway, you need to follow these steps:
- Open the Code Editor of the Tag Template which you want to modify
- Require the send Message library with this line of code:
const sendMessage = require('sendMessage');- Use the sendMessage Api with the message Type ‘send_response’ and as message, set an object with a parent key which should be the Name of the Tag. In this Example, it is an Amplitude Tag so the parent key is set to “amplitude”. Example:
 //return response to JSON Client
 sendMessage('send_response', {
   amplitude: {
     api_key: apiKey
   }
});- Update the Uses messages permission and set it to “Any”.
- Save the Template and test if it works as expected.
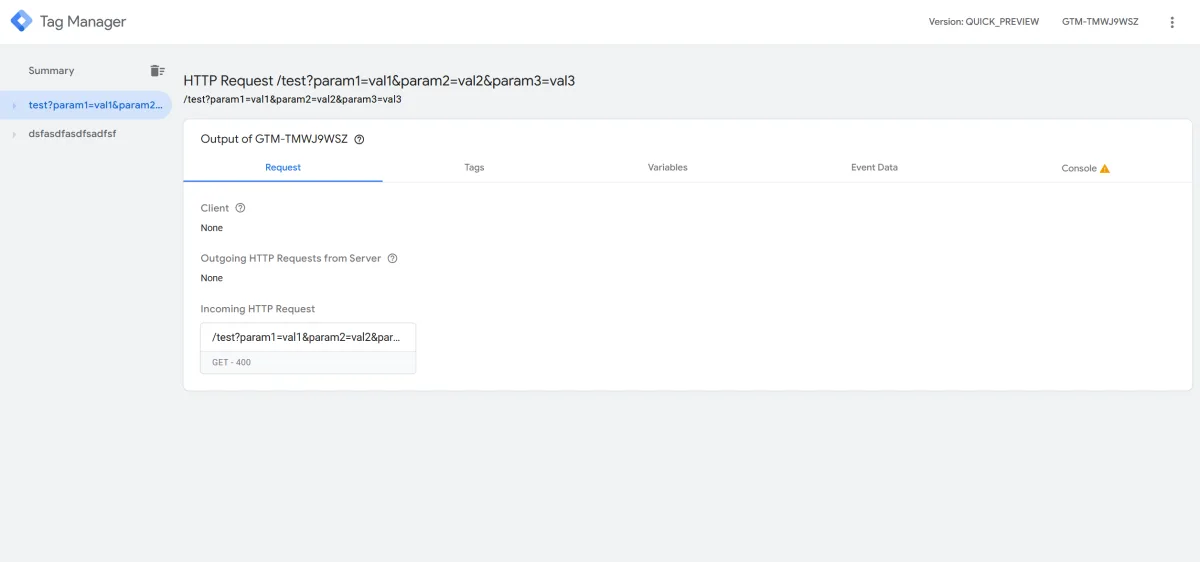
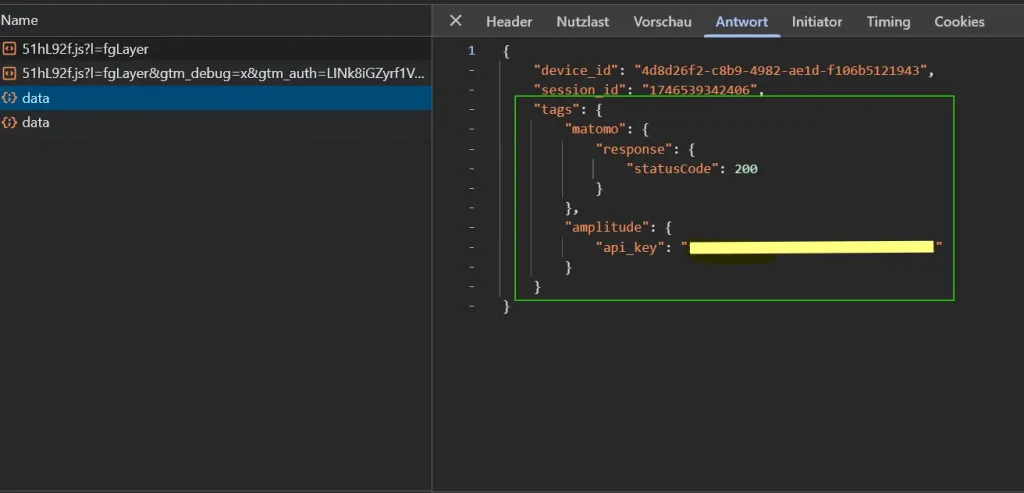
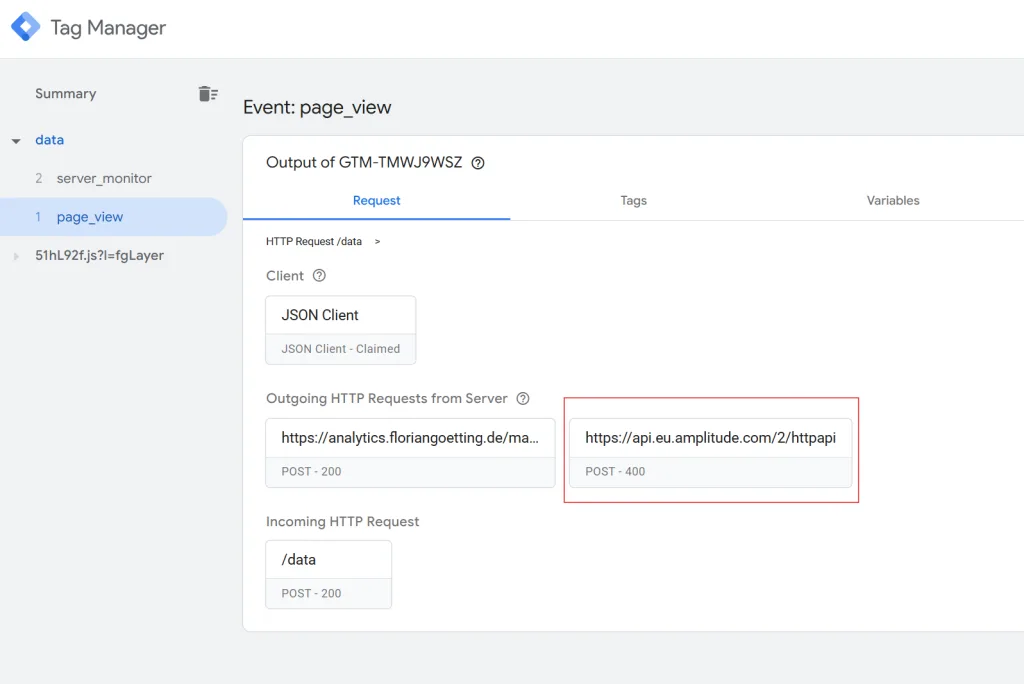
If you inspect the JSON Tag Network Calls and have a look at the response, you should be able to see your custom server tag data now under “tags”:
In the GTM preview mode you should also see that this data is pushed into the data layer:
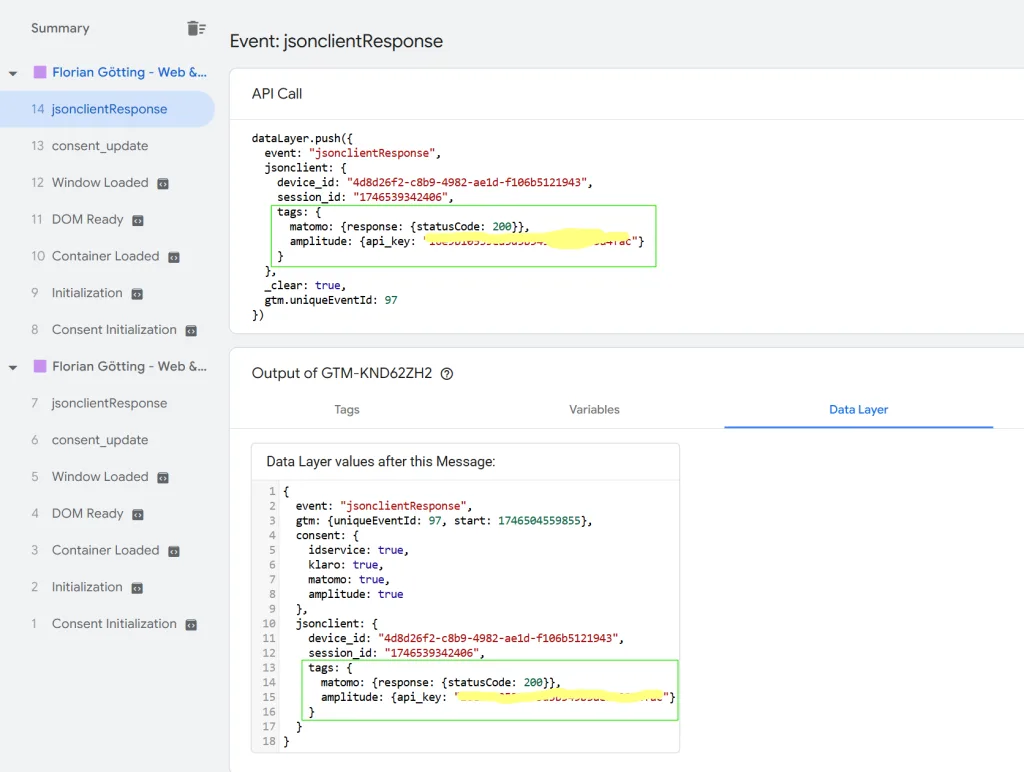
You can create your own GTM Data Layer Variables to access the data and use it as you wish 🙂
How to get a more detailed Monitor Event
If you enable the Monitor Event, the first step you should do afterwards is to enable the Additional Tag Metadata in your Server Tags. This will enable you to identify the actual tag which failed or succeeded. To do this, go to each Server Tag Configuration and search for the section “Additional Tag Metadata”. Activate the option “Include tag name” and just enter “name” in the “Key for tag name”. Now you will see the Name of the tag in the Monitor Event in case it matches the conditions in the monitoring settings.
For a more detailed monitoring, you can also send any information from the Server Tag to JSON Client to be included in the Monitor Event. You can use this for example to send the response from the Server Tag to JSON Client in case of a failure or success. As a result you will have much more actionable insights. If you want to use this feature, you would need to update the Template Code of the Server Tag where you want to send data from.
Please note
When updating a Tag Template, you won’t receive automatic updates of the Tag Template anymore from the Template Gallery.
Sending Monitor Data from a Server Tag to JSON Client
If you want to proceed with this anyway, you need to follow these steps
- Open the Code Editor of the Tag Template which you want to modify.
- Require the send Message library with this line of code:
const sendMessage = require('sendMessage');- Use the sendMessage Api with the message Type ‘server_monitor’ and as message set an object with an attribute ‘service’ with an identifier of the tag and set any additional attributes which you want to measure in the Monitor Event. Example:
sendMessage('server_monitor', {
   'service': 'amplitude',
   'status': 'failure', // indicates if a 'failure' or 'success' is measured
   'request': postBody,
   'response': JSON.parse(responseBody)
});- Update the Uses messages permission and set it to “Any”.
If you now produce a tag failure or a tag success where this sendMessage API is used by using some invalid field values, you should see the Monitor Event firing in the ssGTM Preview Mode:
An object called “monitor” will contain the information of the tags and your custom data sent via sendMessage.
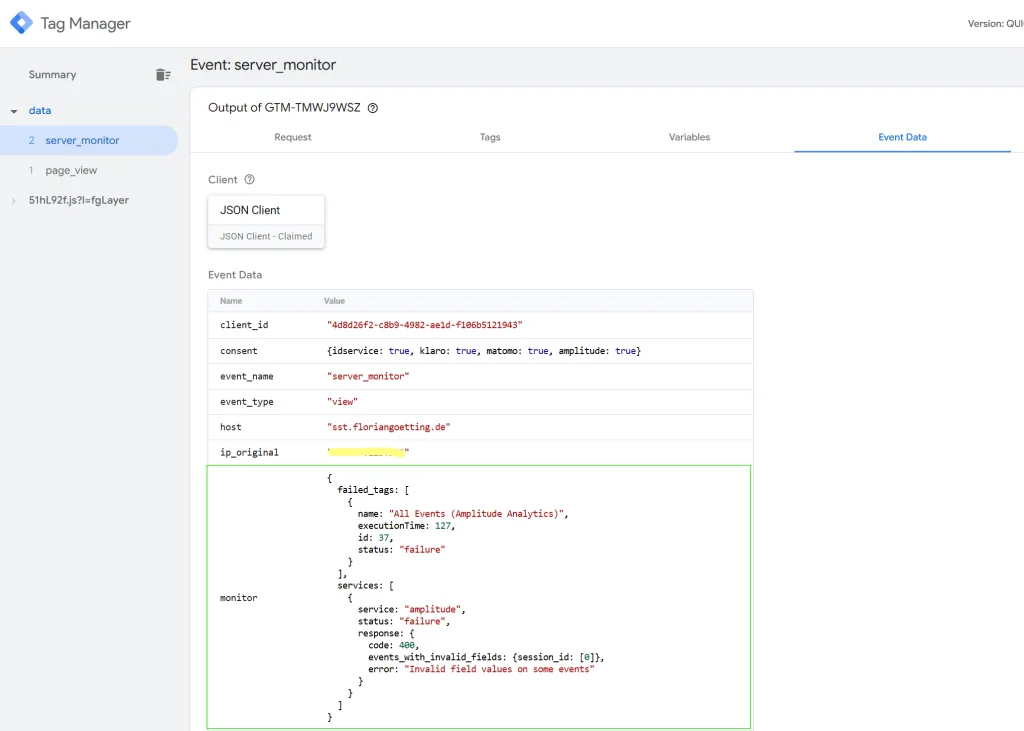
You can track the data with the tag of your choice.
Contributing to the Templates
Contributions to any of the Templates are highly welcome! The process to contribute works like this:
- Fork the repository
- Pull and merge all updates from the main repository
- Make your adjustments to the files locally
- Test the Templates with your changes in GTM and ssGTM
- If you updated a template.tpl file, please do not replace the full original template.tpl file but only the part from “___TEMPLATE_PARAMETERS___” to the end of the file.
- Create small commits with good comments to make it easy to follow your adjustments
- Push the Commits
- Create a new pull request for the main repository including an understandable summary of your changes
I will review the pull request and will provide feedback or questions if something is unclear. If everything is fine, your changes will be merged with the main repository and you will be listed in the list of contributors!
You can see an example in the JSON Tag GitHub Repository where a contribution was already made!
If you want to contribute but you don’t know which adjustments make sense, please check the list of issues, where I and others will list feature wishes or bug reportings.
No Support for GA4 planned
As mentioned in the previous sections, JSON Tag and JSON Client do not support GA4. The support of GA4 is not planned in the future. If you want to use GA4 or contribute to a project for first party tracking with GA4 support, please check out Stapes Data Tag.
If you have questions or feedback, don’t hesitate to contact me on LinkedIn 🙂